Maintaining the water quality in a swimming pool is an ongoing task, and a chlorine tablet floater is one of the essential tools pool owners use to ensure the pool remains clean. These devices help control bacteria and algae growth by continuously releasing chlorine into the water. However, commercial floating chlorine tablet dispensers can be quite expensive, especially for large pools or for those requiring long-term use, making maintenance costs a significant concern.
I. Why Choose a DIY Chlorine Tablet Dispenser?
1.1 Save on Costs
Commercial chlorine tablet floaters or floating chlorine tablet dispensers can range in price from tens to even hundreds of dollars. This cost adds up, especially for large or public pools. A DIY dispenser, made from inexpensive materials, can be customized to fit the size of your pool and its needs, helping you cut unnecessary expenses.
1.2 Customizable Design
Commercial dispensers typically have fixed capacities or functions, limiting your ability to adapt them to your specific pool requirements. A DIY chlorine tablet floater allows you to adjust the number of chlorine tablets and control the release rate of chlorine, ensuring precise water quality maintenance.
1.3 Environmentally Friendly and Sustainable
Making a DIY dispenser allows you to recycle existing materials or use second-hand supplies, reducing plastic waste and environmental impact. These materials are easy to find and work with, making them suitable for daily use.
II. Materials and Tools for DIY Chlorine Tablet Dispenser
Creating a basic floating chlorine tablet dispenser requires simple materials, many of which can be found in your home. Below is a list of materials and tools you’ll need:
2.1 Materials
Plastic Container (e.g., plastic bottles or food containers): Choose a container that is corrosion-resistant and can float on water. Common 2-liter drink bottles or small plastic storage boxes work well as the body of the chlorine tablet dispenser.
Foam (or other buoyant materials): This ensures that the dispenser floats on the water surface, preventing the chlorine tablets from dissolving too quickly.
Rubber bands or zip ties: To secure the container or adjust the chlorine release speed.
Fine mesh bag or cloth bag: To hold the chlorine tablets and control their dissolution rate, preventing direct contact with the pool surface.
Plastic pipe or hole-punching tool: For creating holes in the container to allow water to flow in and dissolve the chlorine tablets.
2.2 Tools
Knife or scissors: For cutting the plastic container and other materials.
Drill or hand punch: To make small holes in the plastic container, allowing water to enter and dissolve the chlorine tablets.
Hot glue gun (or waterproof tape): To attach the buoyant material to the container.
III. Step-by-Step Process
3.1 Step 1: Prepare the Plastic Container
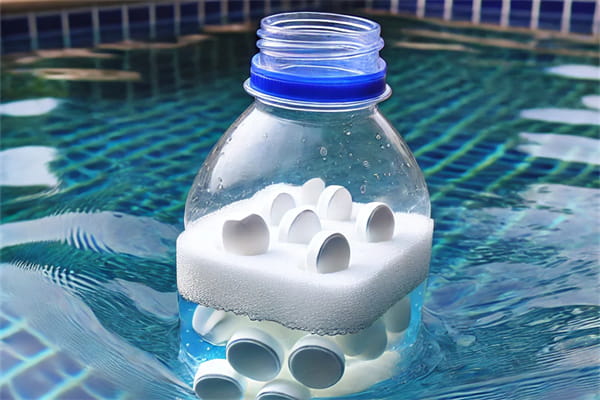
Choose a plastic container that can float in your pool. We recommend a durable plastic bottle or food-grade plastic box since they are waterproof and corrosion-resistant. Drill or punch small holes at the bottom and sides of the container. These holes should be about 2-3 millimeters in diameter, allowing pool water to flow into the container and contact the chlorine tablets.
Note: The number and size of the holes will determine the chlorine tablet dissolution rate. If the holes are too large, the tablets will dissolve too quickly, defeating the purpose of long-term chlorine release. If the holes are too small, the tablets may not dissolve sufficiently, affecting water quality.
3.2 Step 2: Add Buoyant Materials
To ensure that your DIY floating chlorine tablet dispenser stays afloat, attach foam or other buoyant materials to the top of the container. Use a hot glue gun or waterproof tape to secure these materials, making sure they won’t detach or corrode in the water.
Tip: If the container itself has enough buoyancy (e.g., an empty plastic bottle), you can skip this step. Just make sure the dispenser remains stable in the water and doesn’t flip over due to wind or water currents.
3.3 Step 3: Create the Chlorine Tablet Compartment
Place the chlorine tablets inside a fine mesh or cloth bag. The material of the bag should have enough porosity to allow water to flow in and dissolve the chlorine. Insert the bag into the container, ensuring it floats inside without sinking to the bottom.
Important: Placing the tablets directly into the container may cause them to dissolve too quickly at the bottom. Using a mesh bag ensures even dissolution and controlled chlorine release.
3.4 Step 4: Seal and Secure
Close the container and ensure the top or lid won’t open easily. You can use rubber bands or zip ties to secure the container further. You may also attach a plastic pipe or rope to the outside of the container, allowing you to adjust or retrieve the dispenser easily later.
3.5 Step 5: Test and Adjust
Place your DIY floating chlorine tablet dispenser into the pool for a test run. Observe whether it floats stably on the surface and if the chlorine tablets dissolve at a suitable rate. If the tablets dissolve too quickly or too slowly, you can adjust the size or number of holes in the container or modify the number of tablets inside.
Ⅵ. Conclusion
By creating your own chlorine tablet floater or floating chlorine tablet dispenser, you can save on pool maintenance costs while ensuring that the chlorine release rate is flexible and matches the needs of your pool. This process only requires simple, everyday materials and tools, making it a cost-effective and practical solution.
Beyond the cost savings, making your own floating chlorine tablet dispenser can be a satisfying and creative project. It allows you to effectively manage pool hygiene while minimizing environmental impact.
If you plan on maintaining a pool for the long term and want to reduce costs, a DIY chlorine tablet floater is an efficient and economical option. With continued adjustments and improvements, you’ll ensure that your pool stays clean, giving family and friends a safe and healthy swimming environment.